When I started sewing soft toys as a beginner, there was one stitch I learned that made the most significant difference in how my finished stuffed toys looked – the ladder stitch. Just because of that stitch, the way I closed the stuffed toy’s opening, the finished soft toys looked immediately more professional, beautifully made, and cute!
The best hand stitch you can use to nicely, almost invisibly close the stuffed toy opening
That is the best hand stitch you can use to almost invisibly close the stuffed toy opening. You can use it to repair the hole or close the opening after re-stuffing the toy too.
My boys and I called these repairs operations, and I had to do them very gently under their supervision.
If you do the ladder stitch the right way, only you will know where to look for it later.
Apart from the main stuffed toy closing, you can also use the ladder stitch for closing the parts of the toy where you don’t want visible seams.
How is the ladder stitch done? I include tutorials for all hand stitches in all my SewToy tutorials. I have your back covered each step of the way when you are sewing SewToy magical stuffed toy friends.
Ladder stitch tutorial for the invisible hand seam
The perfect closing when sewing the stuffed toys.
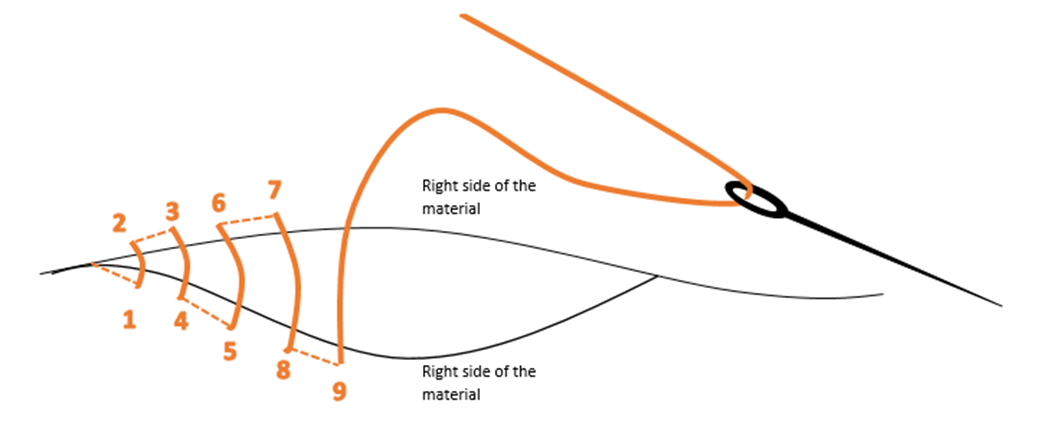
Ladder stitch diagram
The ladder stitch step-by-step picture tutorial
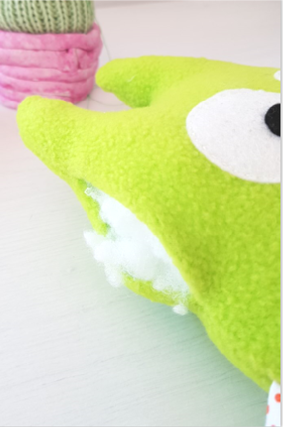
Stuff the stuffed toy through the opening very tightly – you can not overstuff, promise. Push the stuffing very tightly into the ears, legs, or arms.
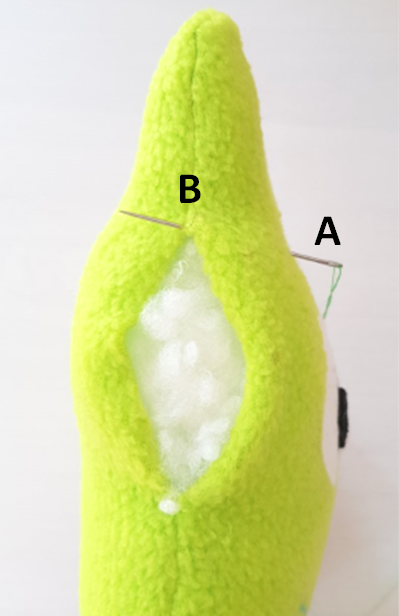
Stab the needle a few cm (inches) away from the opening (point A) and come out at the beginning of the opening (point B). Make three tiny stitches at point B and cut the excessive thread at point A. There will be no knots at the end!

Now, close the opening of your stuffed toy using the ladder stitch – follow the diagram above.
When you reach the end of the opening, first gently pull the thread, and close the opening.
After closing it make three tiny stitches there and afterward hide the thread ending in the stuffed toy body. No knots!
Give a new stuffed toy friend massage to reposition the stuffing nicely.
All SewToy tutorials for cute stuffed toys include detailed tutorials like this one for hand stitches needed to sew that toy, step-by-step with beginner sewers in mind!
Let me know down in the comments if you found this tutorial for ladder stitch, the ultimate invisible seam for closing the openings of the stuffed toys, helpful. Would you appreciate a video tutorial too, or a step-by-step picture tutorial is all you need to make that perfect closing?
We wish you a happy stuffed toy sewing and magic creating,
🌈Maja & 🐻🐶🦊 Cute SewToy plushie friends
P.S. What are the other 5 basic stitces you will need for sewing stuffed toys? Check this post: BASIC 6 HAND-STITCHES FOR SEWING TOYS AND THEIR USAGE

P.P.S. It is always so nice to see, how amazing, unique SewToy creations made by you turn out! I would love to meet them, and YOU! Join us on Pinterest, Instagram, or Facebook, and let's create magic together.


10 Responses
[…] The ladder stitch is similar to running stitch. You will use this one for closing up a hole from the outside or to attach features like arms, legs, head to the surface of a plushie. Available also: Detailed step-by-step photo tutorial for the ladder stitch […]
How do I get the pattern! For Bernie the Cat! Thanks!Donna Lancaster
I’m a little confused about where the three ending stitches are supposed to be. I understand they anchor the thread but I don’t know where to hide them. Thanks!
Thank you for the pictures of the stitch. Very helpful.
Thank you, Linda, happy to know this. 💖✂🧵
Thanks for this helpful information and pictures.
Thank you, Linda, for the feedback! I am really happy you found the pictures and tutorials helpful! 🙂
Wait, you just hide the needle in the toy??!?!? The stitch will come out- and the kid will get hurt!!
Plus, the stitching isn’t even finished in the picture. I’m very confused.
Thank you for your concern! To clarify, we absolutely do not hide the needle in the toy. Instead, we securely hide only the last part of the thread inside the toy, ensuring the stitches are strong and safe for children. Safety is always our top priority when creating toys.