
Soft, colorful balls of all sizes, materials and colors. They are cute. They are handy. They are so easy to make. I just love them.
This free sew tutorial with a pattern is appropriate for beginners. Just follow the steps and in no time you will be a proud owner of your first handmade ball.
Step 1


Print the pattern on this picture.
For bigger ball just enlarge the picture.
Step 2
Cut 6 pieces from the fabric using this  pattern.

 Step 3

Put two pieces together, right sides facing and sew one side.

 Step 4

Add the third piece of fabric to first two, right sides facing and sew. You should have half of the ball now. Repeat steps 3 and 4 to get the other half.

 Step 5

Put one-half into the other half, right sides facing and sew.
Leave a small opening.

 Step 6

Sew and unsew the opening.
This way it will be easier to close the opening at the end.

Step 7
Turn the ball through the opening and fill it with filler.
Step 8
Sew the opening using the ladder stitch.
Step 
 9
9

You are done. 🙂
Congratulations for your first ball.
It was fun and easy, wasn’t it?
How about some more ideas for making the balls even more fun?
- insert a bell inside the ball (babies and small children will love them)
- select different colors and materials
- make different sizes
- use them for indoor children activities (who can hit the box or who can through the ball into the box)
- add faces to the balls
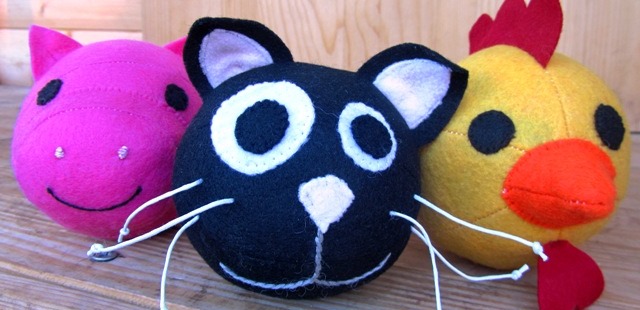
- make animals out of them, like this:
I hope, this tutorial was helpful to you. If you have some fun ideas, what else can be done with this balls, please share.


6 Responses
[…] #11 Creative Colorful balls (Making Tutorial) […]
Thank yiu
[…] 6. Soft & colorful ball from Sew Toy […]
Thank you!!
Loved this Guide on Sewing a Colorful Ball. Awesome!
Thank you for sharing, wishing you an amazing, creative day! 💕